Posts

Showing posts from 2013

switchMatte

Image
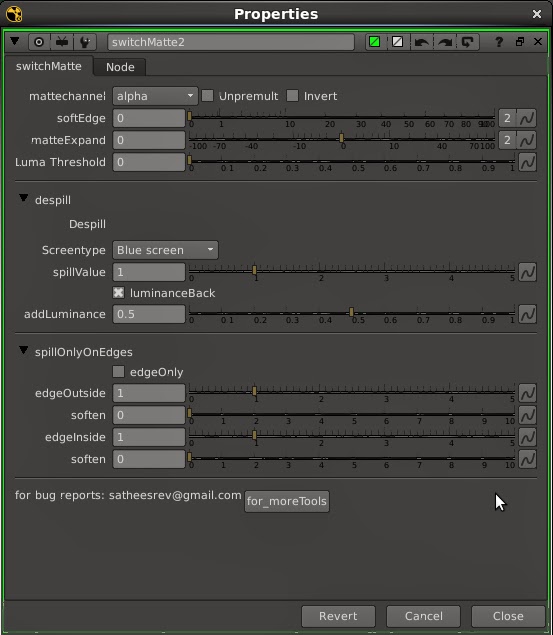
switchMatte v2.0 So long before i created this tool for my personal use. Recently improved the tool with extra control's. switchMatte v2.0 works like shakes switchmatte and Fusion matte control. Added spill control with in the node So user no need to add extra Spill nodes. switchMatte v2.0 interface. Matte channel drop-down menu allowing you to choose the matte channel. User can expand and blur the alpha channel. Luma threshold slider can increase and decrease the luminance value. Despill menu allowing you to remove the spill from the image. spill only edges control the despill area.  Download and play with this tool and leave the comment and requests. Download: http://www.nukepedia.com/gizmos/channel/switchmatte

rename roto shapes in silhouette

Image
rename_shapes.py I know this is for another application. Anyhow this script will help you friends. So im sharing this with you. I searched very long some python code for rename roto shapes in silhouette. I tried my self sometime but can't make it exactly what i want. Accidentally i got the script from Johnny Chan's web site. http://picostyle.com/scripts/ I made some changes with his script to make it more usable. You can customize as per your need. Hope this will help you friends. This code will take the Layer name and replace the name to shapes inside the Layer. So no need to rename your hundreds and hundreds of roto shapes manually inside silhouette. Follow below steps To make it work.. Before: 1. Rename your Layer: 2. Go to satheesh in menu bar. Under satheesh you can find Rename-> Rename shapes.  select . ( silhouette 5plus) Go to Action in menu bar. Under Action you can find Rename-> Rename shapes.  select . ( silhouette 4 or bel

Bake tracker to Roto

Image
trackRoto.py Everyday we are (compers) doing this process so many times. We use tracker information to do most of the Roto. For doing this we are doing following things:   Usually Some compers copy the Tracker node and paste it next to the Roto node which need to match-moved. Some use to copy paste the Trackers animation value into roto node's Root transform. Following first step will slow down out script. Think if you have 50-100 roto shapes with tracker node. Connecting tracker values to roto node is best way, But connecting manually with so many roto node is time consuming process. So found the solution to automate this process. trackRoto.py. Run this code with tracker node selected. This will create a roto node with selected tracker nodes  track information baked. S o draw shape at any point and it will follow the tracked object.. This code will bak e trac king infor mation based on your tracker node. I f your tracker node enabled onl y transform infor

superCrop

Image
sCrop.py Nuke's crop node missing the future of select a region and crop. So i found little cheat way to achieve this.  This little script get the value from ROI and set the value to selected crop node. Step - 1: Add  a crop node. Step - 2: Enable ROI draw mode by " alt+w " Step - 3: Choose your region using mouse drag on Viewer. Disable the ROI by " shift+w " ( currently 'roi' enable or disable is not accessible via python, So we have to disable it by manually ) Step - 4: Run this code. Video example:   Hope this will help you friends... python code: import os, math, nuke def sCrop():     sel = None     try:       sel = nuke.selectedNode()     except ValueError:  # no node selected       pass     if sel is not None:         ### getting value from ROI         roiXY = nuke.activeViewer().node().roi()         crpX = roiXY['x']         crpY = roiXY['y']         crpT = roiXY['t']    

nuke particle templates

Image
Nuke particle Templates Hi nuker's this page dedicated for nuke particle templates. I will keep update this page with different nuke particle template's. Enjoy....  1. sparks ( welding sparks) This is simple sparks, you can manipulate as per your need. Download: sparks_v01.nk

Nuke 7.0 roto shapes to Nuke 6.0 - 6.3

Image
Nuke 7.0 roto shapes to Nuke 6.0 - 6.3 Hi friends today i faced a problem with nuke roto shapes because of version-up. I done roto with nuke 7.0 and my friend need it for nuke 6.3. I just rendered as image sequence and send it to him. Everything is fine.  But the edit has changed later and frames extended at beginning of the shot. So i searched with google and found a solution. Thank you foundry!!! always artist friendly.. They already have solution for this. They documented this with release notes. You can find this nuke 7.0v1 release notes page no 8. If you want Nuke 7 scripts to load in Nuke 6, use the convertToNuke6 or convertDirectoryToNuke6 Python functions when running Nuke 7 in terminal only mode. Here is the step to convert nuke7 rotoshape to nuke 6 rotoshape. Save your roto-shapes into new nuke file and save it into separate folder. step 01. open terminal and redirect to nuke7 installed DIR. step 02. Run nuke terminal mode. for

paintNodeOpacity.py

Image
paintNodeOpacity python code This little code will help you to control nuke "rotopaint" nodes clone & paint brush opacity via some short-cut keys. I created this code for my fellow artist who's working with me in paint department. Short-cut keys are assigned as per his need. You can use your custom short-cut keys. There are 5 control option. "shift+>",  "shift+<" user can up & down the opacity value using "shift+>" and "shift+<" . This will jump between current value to +0.05 or -0.05. If your value will 1 it start to decrease 0.95, 0.9, 0.85 so one so forth.... "ctrl+>", "ctrl+<"  user can up & down the opacity value using "ctrl+>" and "ctrl+<" . This will jump between current value to +0.01 or -0.01. If your value will 1 it start to decrease 0.99, 0.98, 0.97 so one so forth.... "ctrl+Shift+< " and "ctrl+Shift+

autoPinning.py

Image
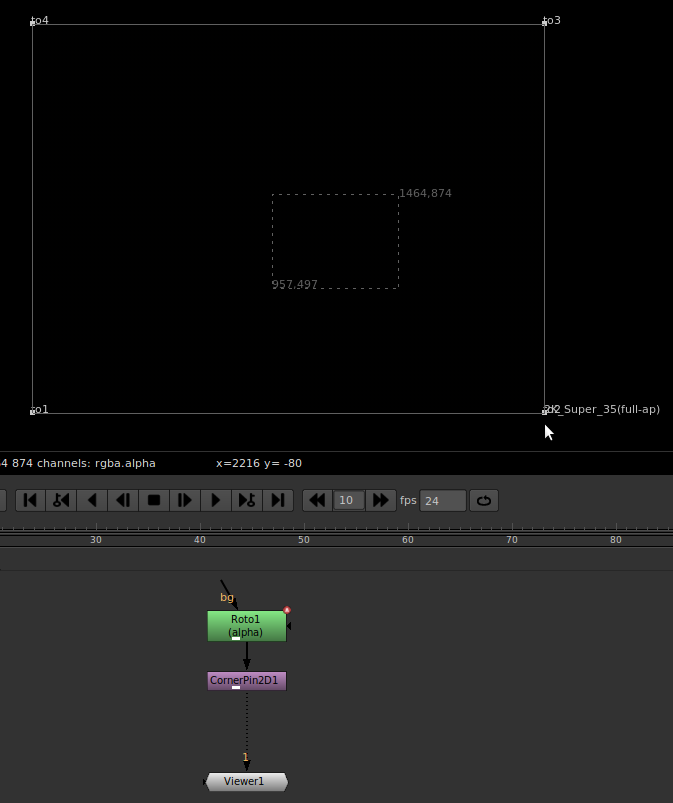
auto pinning nuke cornerPin  This little code place the cornerPin nodes 4 pin's automatically based on the bbox. If your image dosen't have bbox add a crop node and crop it as per your need. Before: After:   Download: autopinning.py python code: ''' Created on 04-august-2013 @author: satheesh mail - satheesrev@gmail.com ''' import sys import nuke def autoPinning():     selNode = None     try:       selNode = nuke.selectedNode()     except ValueError:  # no node selected       pass     if selNode is not None:     ## auto pin for from         selNode['from1'].setExpression('[value name].bbox.x', 0)         selNode['from1'].setExpression('[value name].bbox.y', 1)         selNode['from1'].clearAnimated()         selNode['from2'].setExpression('[value name].bbox.r', 0)         selNode['from2'].setExpression('[value name].bbox.y', 1)    

Help full Nuke short-cut's

Image
Some cool and very help full nuke short-cut's Here i'm going to share some cool and very help full nuke short-cut's with you friends. These are all my favourite short-cut's inside nuke. 1. "ctrl+up arrow or ctrl+down arrow" you can move your selected node to above or below the next node. But this will not work with multiple nodes. You cant move multiple nodes with this short-cut. (you can create some python code for doing this) 2. "crtl+shift+c" This will pop-up the selected nodes "tile_color" picker window. You can color code the selected node or nodes same time. 3. "ctrl+right arrow & left arro w" This will jump into half of the time in your time line. example: If your current frame is 50 ctrl+left arrow will jump to 25th frame. If you give it again it will jumb into 13. Your mouse should in viewer window. This short-cut also work with key frames. you can jump in-between the

Bouncing ball.... Using Nuke particle system.

Image
Nuke particle system After some request's i'm creating this post for various nuke particle example. 1. Bouncing balls using Nuke's particle system. Here i  created simple bouncing balls scene using nuke's particle systems. I used some "trick" to create shadows and hiding the objects while rendering using some shader trick.  Example video: This is the node graph of this nuke script. Hope this will help you guys.  More particle tut's in future...... Script:  Nuke_Particles_v04.nk

Auto pivot

Image
autoPivot.py Transforming, rotating, skewing and scaling all are happening based on the pivot point in every image editing software. So placing the pivot point in right place will handy to do above things. In nuke... transform node's pivot point set to centre based on the project format by default. If our image is in a part of the format. While doing translate, rotate and scaling this causing some problem. To do uniform scale or rotate we will move the pivot to image centre or image bottom centre by holding " ctrl+mouse click ". But we cant place it exactly in the middle or bottom middle. How to reduce this manual job ? Auto pivot.py will help you to place the pivot to centre of the image or bottom centre of the image by using short-cut keys. Pivot centre after run the script: Pivot bottom centre after run the script: Auto pivot needs "bbox" to perform this action. So keep your bbox set to the image size. This little python script sa

Export Nuke's retime information

Image
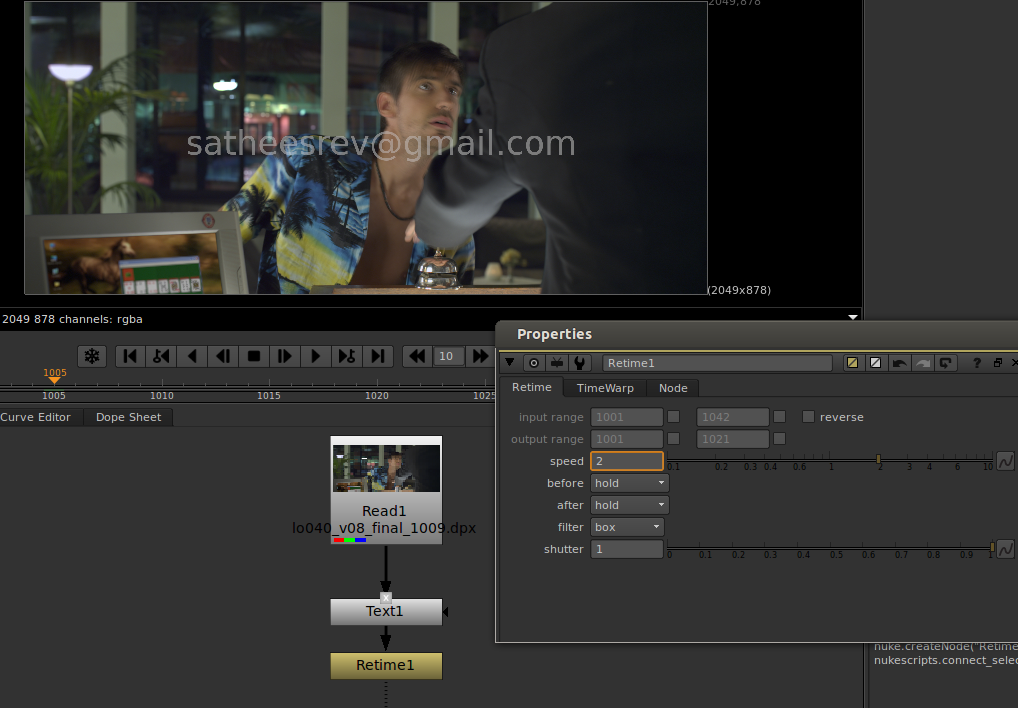
Export Nuke's retime information To 3D packages: This is happen while working with production. In most cases retiming is done beforehand or at the end of a comp. Some time shots getting retimed after Match-move is done. By that time Nuke's retime data (curve) will help to match the tracked camera to new retimed plate. Here is the trick to export nuke's retime date (curve) to 3D packages such as maya, max, Houdini etc. Here im explaining how to export nuke's retime curve to maya. Constant re-speed. I want to retime my input by 200%. Add a retime node and change the speed to 2. Don't forget to change the filter option to None . Retime node doesn't generate retime curve at all. So note down the output range. It changed from original range 1001 - 1042 to 1001 - 1021. Which means our input ended with 1021. Add a TimeWarp node and set keyFrames based on our retime output result. Set a key frame at 1001 as 1001 in input frame knob. Got

flop flip in nuke

Image
flopFlip.py Nuke doesn't have this small and very handy utility built-in. For doing this function in nuke we need to use "VIEWER_INPUT" method (or) add mirror node and connect it with a (any) node, then constantly check and un-check the Horizontal or vertical knob. Finally you have to delete the mirror node. flopFlip script dosen't need above step 's. Just press ctrl+F for flop, ctrl+shift+F for flip. Before:  After: flopFlip will help you to flop & flip your current viewer result. I use to do this for checking my final comps and review my shots. Playback software's like RV, frame-cycler and other tools have this handy function. flopFlip: Hope this will help you friends. download: flopFlip.py nukepedia:  nukepedia ''' Created on 21-apr-2013 @author: satheesh-R mail - satheesrev@gmail.com http://satheeshnuketutorials.blogspot.in/ Add following lines to your menu.py: import flopflip menuBar.addComman

Magic_CornerPin2D

Image
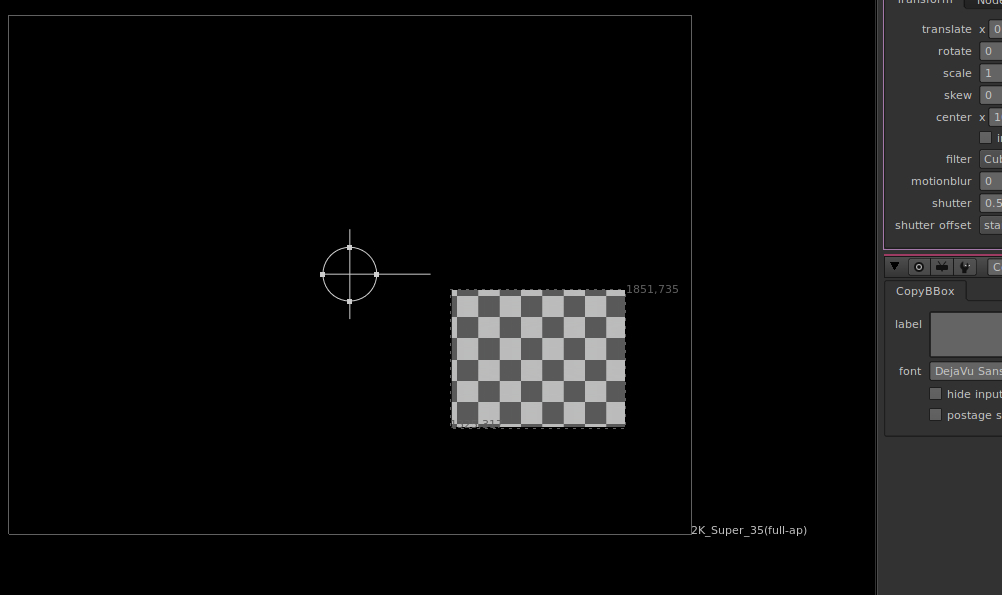
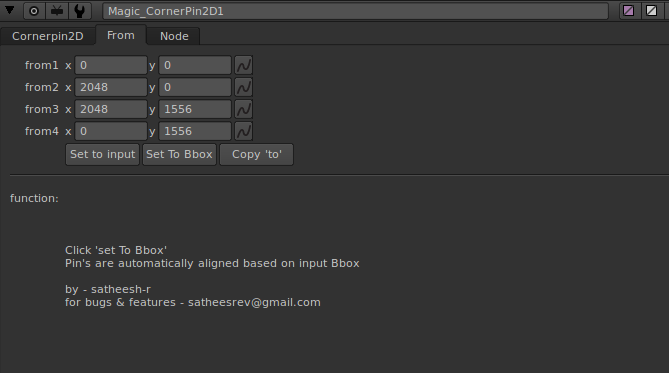
Magic_CornerPin2D gizmo make your life easier to place your pin's on right place by single mouse click. Added extra function called 'set To bbox' in From tab. Load Magic_CornerPin2D and goto From tab and click 'set To bbox' button..... pins are automatically placed based on input bounding box. After click 'set To bbox'....  Hope this will help you guys. Download:  from sky drive nukepedia sample script: set cut_paste_input [stack 0] version 6.3 v4CheckerBoard2 {  inputs 0  name CheckerBoard1  selected true  xpos -40  ypos -267 } Crop {  box {275 380 1480 1015}  name Crop1  selected true  xpos -40  ypos -182 } Magic_CornerPin2D {  name Magic_CornerPin2D1  selected true  xpos -40  ypos -105  disable true  "extra matrix" 0  from1 {274 379}  from2 {1481 379}  from3 {1481 1016}  from4 {274 1016} }

saveImage

Image
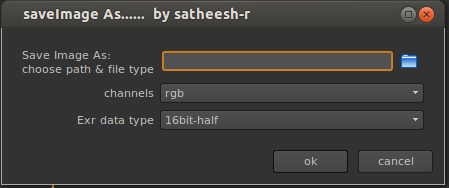
saveImage.py Hi nuker's finally found a solution for our long time wish and expectation. Now you can save image from the viewer. Like eyeon fusion and other application. saveImage.py will allowing you to choose the path and file name and type. Now you can choose the image as any format (which ever nuke support). example jpg, tga, tiff, png et. Added extra future channels. user can select channels to save image. Added extra future while saving as exr you can choose the Data type. Default its in 16bit-half, either you can choose32-bit float. Fixed sub-sampling to 4:4:4 while save as .jpg. Go to active viewer and right click select the save image as. It will pop-up a window like below image. Choose your path and file type. Hit ok it will save your active viewer result as image, It creates a read node and import your saved image into nuke. If you forget to choose path and file type nuke will pop-up a message box like below image: Hop

shuffleAlpha.py

Image
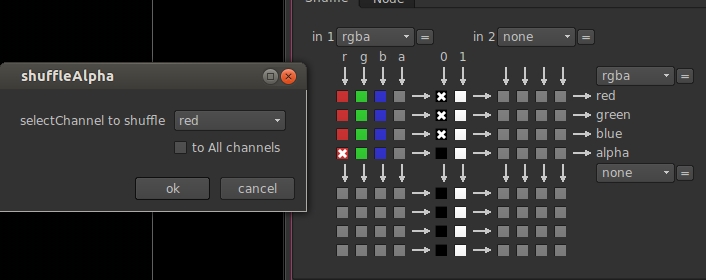
shuffleAlpha Usually we use shuffle node to extract matte's from ID pass. For to do this we add a shuffle node and select the channel which need to be alpha channel.   This script will simplify this work, Its pop-up a panel (window)  called "selectChannel to shuffle" and you should choose your channel and click ok. This script will automatically done the above job. shuffleAlpha script also label the node like (red-->Alpha).  Added extra future called "to All channel". By default "to All channel" is unchecked, If you select your channel and hit ok it will give you below result. (This script keep other channels black rather then "alpha" channel) I used to work like this, Because off work-flow optimisation. For more information about nuke work-flow optimisation tips.... nuke-workflow-optimisation-tips With "to All channel" checked result: Also shuffleAlpha.py will label the shuffle node according to your select